Volley is a networking library developed by Google and introduced during Google I/O 2013. It was developed because of the absence, in the Android SDK, of a networking class capable of working without interfering with the user experience.
Until the release of Volley, the canonical Java class java.net.HttpURLConnection and the Apache org.apache.http.client were the only tools available to Android programmers to
develop a RESTful system between a client and a remote backend.
Putting aside for a moment the fact that these two classes aren't exempt from bugs, it should be noted how everything that went beyond a simple HTTP transaction had to be written ex novo. If you wanted to cache images or prioritize requests, you had to develop it from scratch.
Fortunately, now there's Volley, created and tailored to fulfill these needs.
1. Why Volley?
Avoid HttpUrlConnection
and HttpClient
On lower
API levels (mostly on Gingerbread and Froyo), HttpUrlConnection and HttpClient are far from being perfect. There are some knownissues and bugs that were never fixed. Moreover, HttpClient was deprecated in the last API update (API 22), which means that it will no longer be maintained and may be
removed in a future release.
These are sufficient reasons for deciding to switch to a more reliable way of handling your network requests.
And Avoid AsyncTask Too
Since the introduction of Honeycomb (API 11), it's been mandatory to perform network operations on a
separate thread, different from the main thread. This substantial change led the way to massive use of the AsyncTask<Params, Progress, Result> specification.
With AsyncTask, you first define some preparatory actions, such as the definition of the context, in onPreExecute. You then perform your asynchronous tasks using the doInBackground method. Finally, you handle results in onPostExecute. It's pretty straightforward, way easier than the implementation of a service, and comes with a ton of
examples and documentation.
The main
problem, however, is the serialization of the calls. Using the AsyncTask class, you
can't decide which request goes first and which one has to wait. Everything happens FIFO, first in, first out.
The problems arise, for example, when you have to load a list of items that have attached a thumbnail. When the user scrolls down and expects new results, you can't tell your activity to first load the JSON of the next page and only then the images of the previous one. This can become a serious user experience problem in applications such as Facebook or Twitter, where the list of new items is more important than the thumbnail associated with it.
Volley aims to solve this problem by including a powerful cancellation API. You no longer need to check in onPostExecute whether the
activity was destroyed while performing the call. This helps avoiding an unwanted NullPointerException.
It's Much Faster
Some time ago, the Google+ team did a series of performance tests on each of the different methods you can use to make network requests on Android. Volley got a score up to ten times better than the other alternatives when used in RESTful applications.
It Caches Everything
Volley automatically caches requests and this is something truly life-saving. Let’s return for a moment to the example I gave earlier. You have a list of items—a JSON array let’s say—and each item has a description and a thumbnail associated with it. Now think about what happens if the user rotates the screen: the activity is destroyed, the list is downloaded again, and so are the images. Long story short, a significant waste of resources and a poor user experience.
Volley proves to be extremely useful for overcoming this issue. It remembers the previous calls it did and handles the activity destruction and reconstruction. It caches everything without you having to worry about it.
Small Metadata Operations
Volley is perfect for small calls, such as JSON objects, portions of lists, details of a selected item, and so on. It has been devised for RESTful applications and in this particular case it gives its very best.
It is not so good, however, when employed for streaming operations and large downloads. Contrary to common belief, Volley's name
doesn't come from the sport dictionary. It’s rather intended as repeated
bursts of calls, grouped together. It's somehow intuitive why this library doesn't come in handy when, instead of a volley of arrows, you want to
fire a cannon ball.
2. Under the Hood
Volley works on three different levels with each level operating on its own thread.
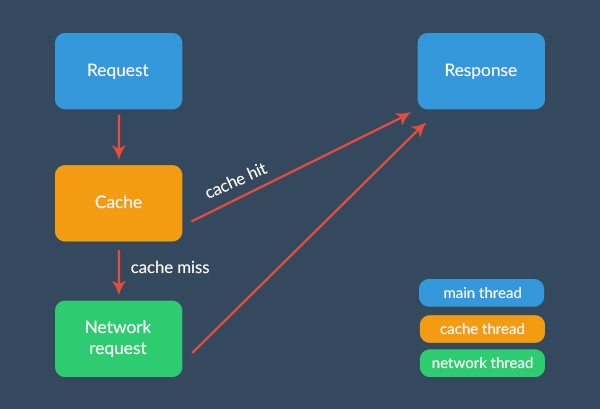
Main Thread
On the main
thread, consistently with what you already do in the AsyncTask specification, you are only allowed to fire the request and handle its response. Nothing more, nothing less.
The main consequence is that you can actually ignore everything that was
going on in the doInBackground method. Volley automatically manages the HTTP transactions and the catching network errors that you needed to care about before.
Cache and Network Threads
When you add a request to the queue, several things happens under the hood. First, Volley checks if the request can be serviced from cache. If it can, the cached response is read, parsed, and delivered. Otherwise it is passed to the network thread.
On the
network thread, a round-robin with a series of threads is constantly working. The
first available network thread dequeues the request, makes the HTTP request, parses the response, and writes it to
cache. To finish, it dispatches the parsed response back to the main thread where your listeners are waiting to handle the result.
3. Getting Started
Step 1: Importing Volley
Volley isn't so handy to set up. It looks as if there's no official Maven repository available and this is quite bewildering. You have to
rely on the official source code. You can import Volley one of several ways.
First things first, download the Volley source from its repository. If you feel confident doing this, this Git command can do all the work for you:
git clone https://android.googlesource.com/platform/frameworks/volley
Until
some weeks ago, you could wrap everything up using the ant command line (android update project -p . and then ant jar) and importing your JAR library in your Android Studio project with a simple compile files('libs/volley.jar').
Recently, though, Google updated Volley to the Android Studio build style, making it harder to create a standalone JAR. You can still do it, but only with older versions of the library. I personally discourage you to use this option, even though it may seem the quickest.
You should set up Volley the classic way, that is, by importing the
source as a module. In Android
Studio, with your project opened, select File > New Module, and choose Import
Existing Project. Select the directory where you've just downloaded the source code and confirm. A folder named Volley will show up in your project structure. Android Studio automatically updates your settings.gradle file to include the Volley
module so you just need to add to your dependencies compile project(':volley') and you’re done.
There is a third way. You can add to the dependency section of the build.gradle file this line:
compile 'com.mcxiaoke.volley:library-aar:1.0.15'
It’s a mirror copy of the official Google repository, regularly synced and updated. It's probably the simplest and fastest way to get started. However, be aware, it’s an unofficial Maven repository, no guarantees and not backed by Google.
In my opinion, it's still better to invest a few more minutes importing the official source code. This way, you can easily jump to the original definitions and implementations so that, in case of doubt, you can always rely on the official Volley source—and even change it if you need to.
Step 2: Using Volley
Volley mostly works with just two classes, RequestQueue and Request. You first create a RequestQueue, which manages worker threads and delivers the parsed results back to the main thread. You then pass it one or more Request objects.
The Request constructor always takes as parameters the method type (GET, POST, etc.), the URL of the resource, and event listeners. Then, depending on the type of request, it may ask for some more variables.
In
the following example, I create a RequestQueue object by invoking one of Volley's convenience methods, Volley.newRequestQueue. This sets up a RequestQueue object, using default
values defined by Volley.
String url = "http://httpbin.org/html";

// Request a string response
StringRequest stringRequest = new StringRequest(Request.Method.GET, url,
            new Response.Listener<String>() {
    @Override
    public void onResponse(String response) {

        // Result handling
        System.out.println(response.substring(0,100));

    }
}, new Response.ErrorListener() {
    @Override
    public void onErrorResponse(VolleyError error) {

        // Error handling
        System.out.println("Something went wrong!");
        error.printStackTrace();

    }
});

// Add the request to the queue
Volley.newRequestQueue(this).add(stringRequest);
As you can see, it’s incredibly straightforward. You create the request and add it to the request queue. And you’re done.
Note that the listener syntax is similar to AsyncTask.onPostExecute, it simply becomes onResponse. This isn't a coincidence. The developers that worked on Volley purposefully made the library's API so similar to the
AsyncTask methods. This makes the transition from using AsyncTask to Volley that much easier.
If you have to fire multiple requests in several activities, you should avoid using the above approach, Volley.newRequestQueue.add. It's much better to instantiate one shared request queue and use it across your project:
MySingletonClass.getInstance().getRequestQueue().add(myRequest);
We'll see specifically to develop something like this in the next tutorial of this series.
4. Put Your Hands in the Dough
Handling Standard Requests
Volley comes in handy for implementing three very common request types:
StringRequestImageRequestJsonRequest
Each of these classes extend the Result class that we used earlier. We already looked
at the StringRequest in the previous example. Let’s see instead how a JsonRequest works.
String url = "http://httpbin.org/get?site=code&network=tutsplus";

JsonObjectRequest jsonRequest = new JsonObjectRequest
        (Request.Method.GET, url, null, new Response.Listener<JSONObject>() {
            @Override
            public void onResponse(JSONObject response) {
                // the response is already constructed as a JSONObject!
                try {
                    response = response.getJSONObject("args");
                    String site = response.getString("site"),
                            network = response.getString("network");
                    System.out.println("Site: "+site+"\nNetwork: "+network);
                } catch (JSONException e) {
                    e.printStackTrace();
                }
            }
        }, new Response.ErrorListener() {

            @Override
            public void onErrorResponse(VolleyError error) {
                error.printStackTrace();
            }
        });

Volley.newRequestQueue(this).add(jsonRequest);
Beautiful. Isn’t it? As you can see, the type of result is already set to JSONObject. You can ask for a JSONArray too if you want, using a JsonArrayRequest instead of a JsonObjectRequest.
As before, the first parameter of the constructor is the HTTP method to use. You then provide the URL to fetch the JSON from. The third variable in the example above is null. This is fine as it indicates that no parameters will be posted along with the request. Finally, you have the listener to receive the JSON response and an error listener. You can pass in null if you want to ignore errors.
Fetching images require a bit more work. There are three possible methods for requesting an image. ImageRequest
is the standard one. It displays the picture you requested in a common ImageView, retrieving it via a provided URL. All the decoding and
resizing operations you may want Volley to perform happen on a worker thread. The second option is the ImageLoader class, which you can think of as an orchestrator of a large
number of ImageRequests, for example, to populate a ListView with images. The third option is NetworkImageView, which is a sort of XML substitute for the ImageView layout item.
Let’s look at an example.
String url = "http://i.imgur.com/Nwk25LA.jpg";
mImageView = (ImageView) findViewById(R.id.image);

ImageRequest imgRequest = new ImageRequest(url,
        new Response.Listener<Bitmap>() {
    @Override
    public void onResponse(Bitmap response) {
        mImageView.setImageBitmap(response);
    }
}, 0, 0, ImageView.ScaleType.FIT_XY, Bitmap.Config.ARGB_8888, new Response.ErrorListener() {
    @Override
    public void onErrorResponse(VolleyError error) {
        mImageView.setBackgroundColor(Color.parseColor("#ff0000"));
        error.printStackTrace();
    }
});

Volley.newRequestQueue(this).add(imgRequest);
The first parameter is the URL of the picture and the second one is the listener for the result. The third and fourth parameters are integers, maxWidth and maxHeight. You can set them to 0 to ignore these parameters. After that, ImageRequest asks you for the ScaleType used to calculate the needed image size and for the format to decode the bitmap to. I suggest always using Bitmap.Config.ARGB_8888. Finally, we pass in an error listener.
Note that Volley automatically sets the priority of this request to LOW.
// Snippet taken from ImageRequest.java,
// in the Volley source code
@Override
public Priority getPriority() {
    return Priority.LOW;
}
Making a POST Request
Switching from a GET request to a POST request is simple. You need to change the Request.Method in the
constructor of the request and override the getParams method, returning a
proper Map<String, String> containing the parameters of the request.
String url = "http://httpbin.org/post";

StringRequest postRequest = new StringRequest(Request.Method.POST, url,
        new Response.Listener<String>() {
            @Override
            public void onResponse(String response) {
                try {
                    JSONObject jsonResponse = new JSONObject(response).getJSONObject("form");
                    String site = jsonResponse.getString("site"),
                            network = jsonResponse.getString("network");
                    System.out.println("Site: "+site+"\nNetwork: "+network);
                } catch (JSONException e) {
                    e.printStackTrace();
                }
            }
        },
        new Response.ErrorListener() {
            @Override
            public void onErrorResponse(VolleyError error) {
                error.printStackTrace();
            }
        }
) {
    @Override
    protected Map<String, String> getParams()
    {
        Map<String, String>  params = new HashMap<>();
        // the POST parameters:
        params.put("site", "code");
        params.put("network", "tutsplus");
        return params;
    }
};
Volley.newRequestQueue(this).add(postRequest);
Canceling a Request
If you want to cancel all your requests, add the following code snippet to the onStop method:
@Override
protected void onStop() {
    super.onStop();
    mRequestQueue.cancelAll(new RequestQueue.RequestFilter() {
        @Override
        public boolean apply(Request<?> request) {
            // do I have to cancel this?
            return true; // -> always yes
        }
    });
}
This way, you don't need to worry about the possibility that the user has already destroyed the activity when onResponse is called. A NullPointerException would be thrown in such a case.
POST and PUT requests, however, should continue, even after the user changes activities. We can accomplish this by using tags. When constructing a GET request, add a tag to it.
// after declaring your request
request.setTag("GET");
mRequestQueue.add(request);
To cancel every pending GET request, we simply add the following line of code:
mRequestQueue.cancelAll("GET");
This way, you only cancel the GET requests, leaving other requests untouched. Note that you now have to manually handle the case in which the activity is destroyed prematurely.
Managing Cookies and Request Priority
Volley doesn't provide a method for setting the cookies of a request, nor its priority. It probably will in the future, since it's a serious omission. For the time being, however, you have to extend the Request class.
For managing cookies, you can play with the headers of the request, overriding the getHeaders method:
public class CustomRequest extends JsonObjectRequest {

    // Since we're extending a Request class
    // we just use its constructor
    public CustomRequest(int method, String url, JSONObject jsonRequest,
                         Response.Listener<JSONObject> listener, Response.ErrorListener errorListener) {
        super(method, url, jsonRequest, listener, errorListener);
    }

    private Map<String, String> headers = new HashMap<>();

    /**
     * Custom class!
     */
    public void setCookies(List<String> cookies) {
        StringBuilder sb = new StringBuilder();
        for (String cookie : cookies) {
            sb.append(cookie).append("; ");
        }
        headers.put("Cookie", sb.toString());
    }

    @Override
    public Map<String, String> getHeaders() throws AuthFailureError {
        return headers;
    }

}
With this implementation, you can directly provide the list of cookies to the request using setCookies.
// Firstly, you create the list of the cookies,
// conformed to the HTTP conventions
// i.e. key=value
List<String> cookies = new ArrayList<>();
cookies.add("site=code");
cookies.add("network=tutsplus");

// then you invoke your custom method
customRequest.setCookies(cookies);

// and finally add the request to the queue
Volley.newRequestQueue(this).add(customRequest);
For the priority, you also need to extend the Request class, overriding the getPriority method. This is what the implementation could look like:
Priority mPriority;

public void setPriority(Priority priority) {
    mPriority = priority;
}

@Override
public Priority getPriority() {
    // If you didn't use the setPriority method,
    // the priority is automatically set to NORMAL
    return mPriority != null ? mPriority : Priority.NORMAL;
}
Then, on the main thread, invoke this line of code to set the priority of the request:
customRequest.setPriority(Priority.HIGH);
You can choose from one of four possible priority states as shown below:
Priority.LOW // images, thumbnails, ...
Priority.NORMAL // residual
Priority.HIGH // descriptions, lists, ...
Priority.IMMEDIATE // login, logout, ...
Conclusion
In this article, we looked at how the Volley networking library works. We first saw why and when it's better to use Volley instead of another solution already included in the Android SDK. We then dove deep into the library's details, looking at its workflow and its supported request types. Finally, we got our hands dirty by creating simple requests and implementing custom ones for handling cookies and prioritization.
In the next part of this series about Volley, we'll create a simple application that leverages Volley. I'll show you how to make a weather application for Mars, using weather data that's collected on Mars by the Curiosity rover.
If you do a lot of Android development, why not speed up your workflow by using one of the thousands of useful Android app templates available on Envato Market? Or contact one of the Android developers on Envato Studio to help you with your project—they can even design your app for you from the ground up!

Comments