So far in this series we've covered the building blocks of Thesis and how to manage your site's settings, but now we want to move toward building your website's overall structure and appearance, or "Skin" as it's referred to in the Thesis Framework. To do this, we’re going to be spending most of our time inside the Thesis Skin Editor.
To get started, you will need:
- Thesis 2.0
- A code editor of some sort (Notepad, Sublime Text, etc...)
- Basic HTML, CSS, and PHP knowledge
1. Using a Blank Skin
Thesis 2.0 comes stock with two pre-built skins, Thesis Classic and Thesis Blank. Some people prefer to build off of Thesis Classic as it already comes stock with several layout combinations, but for those wanting a more "customized" look might opt to go with Thesis Blank, which is essentially a completely blank skin, void of custom functions, styles, hooks, etc.
For the purpose of this tutorial, we're going to build from the Thesis Blank skin that is included in the Thesis Framework, and create a very basic 2-column home page that includes a query for recent posts and a sidebar. Once you get the hang of building templates and working with the Thesis Query Box you will see how easy it becomes to build more templates to support other pages you might need in the future.
To build with the Blank Skin we first need to select it. To select the Blank Skin,
- Click on Thesis from the WordPress menu on the left
- Select "Skins"
- Find Thesis Blank and click the green "Activate Skin" button to set Thesis Blank as your skin
Once selected, go to the Skin Editor so we can begin development. You can get there by going to Thesis > Skins > Skin Editor. When you first click on the Skin Editor you'll notice that a pop up window containing your website appears, along with the Skin Editor's dashboard. This window is a "preview" screen of your website. You can refresh this screen throughout your development to see how things are taking shape.
Now that we're in the Skin Editor, we need to click on HTML from the top (it should default to the HTML section, but just in case, make sure you're in the right spot).
In the Blank Skin the Body box should be completely empty. This location is where we are going to build our HTML structure. Let's begin by building our home page structure.
2. Creating Boxes for HTML Structure
To build each "container" or "element" on our page we are going to use boxes. In the Skin Editor you will see a few pre-built boxes, as well as a section to "Add Boxes" just below it on the right of your screen. We will be adding boxes to build out our structure.
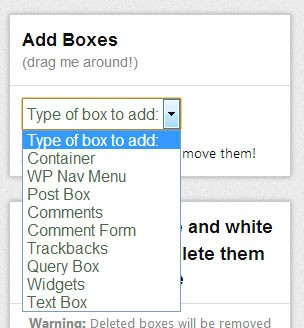
Thesis comes with nine pre-built options to choose from.
They are:
- Container
- WP Nav Menu
- Post Box
- Comments
- Comments Form
- Trackbacks
- Query Box
- Widgets
- Text Box
For the structure of our website, we'll be focusing mostly on creating "Container" boxes. Our structure will go something like this:
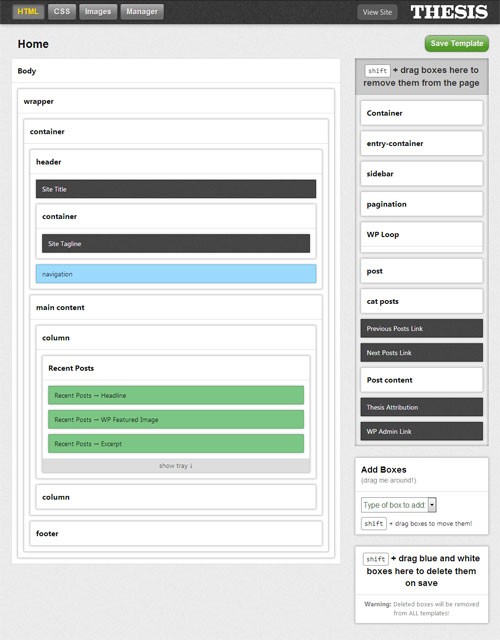
To create each box, follow these steps:
- Find the "Add Boxes" section on the right of the Skin Editor dashboard
- Select "Container" from the drop down list
- Name your box
- Hold "Shift" and drag the created box over to the left, arranging them in the same order as the image above. (To add containers inside of another container, simply drag the box over to the container. When the container you want to dump into is highlighted, release the box.
Once you've got the structure laid out, we need to assign either a class or ID with each element of our structure.
3. Assign CSS Selectors
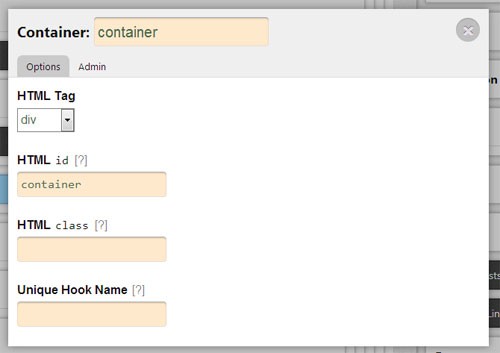
Assigning a class or id to a box element is done by simply hovering over the box, and clicking on the gear icon that appears (very similar to updating your site settings). When the gear icon is clicked you are prompted to fill out some options:
-
HTML Tag
You can select what type of box this will be, for our skin these will all be "div" tags, but you can also choose from several others. -
HTML ID
For boxes that we will only be needing once, like the wrapper and container boxes -
HTML Class
For boxes that we will be using over again
It's important to remember which classes you named each element, because you will need that information when we get ready to style each box.
Below are the following structural CSS selectors used for this particular skin's home page:
- wrapper -
#wrapper - container -
#container - header -
#header - Site Title -
#site_title(Thesis generated id) - Site Tagline -
#site_tagline(Thesis generated id) - navigation -
#menu-primary - main content -
.main_content - left column -
.column_1 - right column -
.column_2 - sidebar -
.sidebar - widget -
.widget - footer -
#footer
4. Creating Additional Templates
Next we need to add a few more "templates" to get everything functioning properly on our skin. We still need to create a page template and a single post template. Because we want to keep the same general layout for each page, we can use the build in Thesis copy template function to copy the elements of the home page and apply them to our other templates.
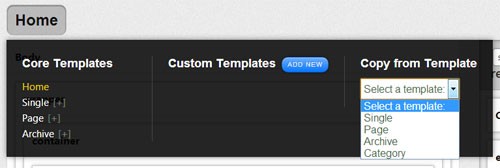
To create another template for our individual post pages, follow these steps:
- Click on "HTML" from the top for the Skin Editor
- Click on "Home" button to reveal a dropdown menu of choices
- Select "Single" from the Core Template list
- Click on the "Single" button to reveal the same dropdown menu as before
- Select "Home" from the Copy from Template dropdown
- Click "Copy Template"
- A prompt warning will pop up, click "OK"
This process will copy your template information over to a new template. Next we need to swap out our recent posts for the individual post/page information. To do this, follow these steps:
- Expand each box in the page structure until you get to the column containing your "Recent Posts" and shift + drag that box over to the right.
- Create a new box and label it post (or whatever you want)
- Select the post elements you'd like to appear on your individual post page (be sure to provide class selectors where possible so you can customize the style as you see fit).
- Save your template
We will repeat the same process to create our interior page template, however instead of copying the Home template, we will copy the single template considering we only need to retrieve the same type content (i.e. the title, content, etc).
For archive pages, be sure to place your "post" content inside of a WP_Loop box (which can be created the same way all other boxes can be created. This WP_Loop box works the same as the loop on the archive or taxonomy pages.)
Conclusion
So far we've created all of our structural elements contained in our Thesis Skin. Now we need to apply some style to them. In the next article, we will cover how to style your skin using the CSS section for the Skin Editor to create "Packages" for each of the CSS selectors we assigned earlier.

Comments