History is always interesting, isn't it? In older versions of HTML, we had limited control over browser history. We could go back and forth using the available methods, but that was it
With the HTML5 History API, we have more control on playing with the browser history. For example, we have a way to add an entry in the history, or change the URL in the address bar without refreshing the page.
Why A History API?
In this article, we'll learn why the HTML5 History API came to be. Before this API existed, we often used hash values to change the page content especially for heavy, single page applications because changing the URL was not possible without refreshing the page. Additionally, when you change the hash value for a URL, it does not make any changes to the browser history.
Now, however, both of these things are available with HTML5 History API and it makes possible to develop script heavy, single-page applications without having to use hash values. It also allows us to build applications in an SEO-friendly manner. Furthermore, this technique allows us to reduce bandwidth - but how?
In this article, we will be developing a single-page application with this API to demonstrate exactly that.
That means we will load all required resources on the first page load. From there onward, the application will download only the required contents. In other words, instead of loading all resources all the time, it will load only required resources from a second content request.
Note that you need to perform some server-side coding to deliver only partial resources instead of full page content.
Browser Support
At the time of writing this article, browser support for the HTML5 History API is quite good, We can review its status here. This link will give you a glimpse of supported browsers but it is always good practice to detect support for particular feature before using it.
To programmatically determine if your browser supports the API, check out the following line of code:
return !!(window.history && history.pushState);
Additionally, I would suggest taking this article to Detect Support for Various HTML5 Features.
If you are using Modernizr, then you should be using below code:
if (Modernizr.history) {
    // History API Supported
}
If your browser does not support history API, then you can use the history.js polyfills.
Manipulating History
HTML5 provides two new methods:
-
history.pushState() history.replaceState()
Both of which allow us to add and update history state, respectively. Both work in the same manner and expect same number of parameters. In addition to these methods, we have popstate event. We will see later in this article for how and when to use this popstate event.
pushState and replaceState both expect the same number of parameters which are as under:
-
statecan store a JSON string and will be available forpopstateevent. -
titleis a parameter is disregarded by the majority of browsers for now, so better to set it tonullfor today.
-
urlcan represent any URL. It will be updated with the browser's address, and it won't care if that URL exists or not. Most importantly, it won't reload your web page.
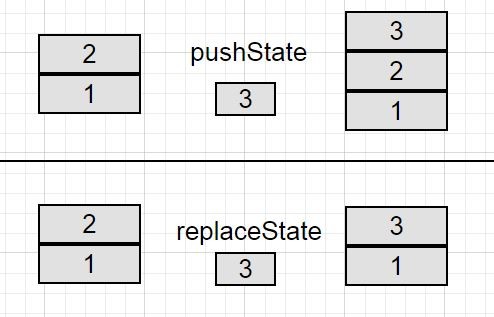
The major differences between these methods are that the pushState will add a new entry in the history stack and replaceState will replace current the history value instead of adding new one. If you are still confused in both these methods, then let's demonstrate the same case with better example.
Let's presume we have stacks of two blocks labeled 1 and 2 and you have block labeled 3 in your hand. Now, when we perform pushState, block 3 will be added to an existing stack so stack would have 3 blocks.
Now assume the same stack with two blocks and one more in your hand. When we perform replaceState, it will pick the block 2 out of stack and place block 3. So the number of history values will remain same. pushState, on the other hand, increases history count by one.
The below image shows the same demonstration.
Thus far, we have covered the pushState and replaceState events in order to control the browser history, but suppose we have a variety of fake history that we have totaled in the browser. The user may or may not redirected to that page. In such a case, it will be a problem when user hits the browser back and forth button to navigate to history pages.
Though you may expect popstate to be fired when the pushState or replaceState methods are addressed, but in reality, it is not the case. Instead, popstate will fire when you are navigating through the session history entry, either by hitting backward or forward buttons or using the history.go or history.back methods.
In WebKit browsers, a popstate event would be triggered after document's onload event, but Firefox and IE do not have this behavior.
The Demonstration
The HTML
<div class="container">
    <div class="row">
		<ul class="nav navbar-nav">
			<li><a href="home.html" class="historyAPI">Home</a></li>
			<li><a href="about.html" class="historyAPI">About</a></li>
			<li><a href="contact.html" class="historyAPI">Contact</a></li>
		</ul>
	</div>
	<div class="row">
		<div class="col-md-6">
			<div class="well">
				Click on Links above to see history API usage using <code>pushState</code> method.
			</div>
		</div>
		<div class="row">
			<div class="jumbotron" id="contentHolder">
				<h1>Home!</h1>
				<p>Lorem Ipsum is simply dummy text of the printing and typesetting industry.</p>
			</div>
		</div>
	</div>
</div>
The JavaScript
<script type="text/javascript">
    jQuery('document').ready(function(){

		jQuery('.historyAPI').on('click', function(e){
			e.preventDefault();
			var href = $(this).attr('href');

			// Getting Content
			getContent(href, true);

			jQuery('.historyAPI').removeClass('active');
			$(this).addClass('active');
		});

	});

	// Adding popstate event listener to handle browser back button
	window.addEventListener("popstate", function(e) {

		// Get State value using e.state
		getContent(location.pathname, false);
	});

	function getContent(url, addEntry) {
		$.get(url)
		.done(function( data ) {

			// Updating Content on Page
			$('#contentHolder').html(data);

			if(addEntry == true) {
				// Add History Entry using pushState
				history.pushState(null, null, url);
			}

		});
	}
</script>
Demo 1: HTML5 History API - pushState
In this demo, you will experience that history entries are being counted in the browser and you can sail through it using the browser back/ forward button. View Demo
Demo 2: HTML5 History API - replaceState
In this demo, you will experience that history entries are being updated in the browsers and you cannot navigate through it using the browser back/ forward button. View Demo
Conclusion
This API has created a great impact on how our web application works. It has removed the dependency on hash values in URLs in order to make it easy to create efficient, SEO-friendly, single-page application.
It's a really nice API, isn't it?

Comments