Introduced with the Vision libraries in Play Services 8.1, Face Detection makes it easy for you as a developer to analyze a video or image to locate human faces. Once you have a list of faces detected on an image, you can gather information about each face, such as orientation, likelihood of smiling, whether someone has their eyes open or closed, and specific landmarks on their face.
This information can be useful for multiple applications, such as a camera app that automatically takes a picture when everyone in the frame is smiling with their eyes open, or for augmenting images with silly effects, such as unicorn horns. It is important to note that Face Detection is not facial recognition. While information can be gathered about a face, that information is not used by the Vision library to determine if two faces come from the same person.
This tutorial will use a still image to run the Face Detection API and gather information about the people in the photo, while also illustrating that information with overlaid graphics. All code for this tutorial can be found on GitHub.

1. Project Setup
To add the Vision library to your project, you need to import Play Services 8.1 or greater into your project. This tutorial imports only the Play Services Vision library. Open your project's build.gradle file and add the following compile line to the dependencies node.
compile 'com.google.android.gms:play-services-vision:8.1.0'
Once you have included Play Services into your project, you can close your project's build.gradle file and open AndroidManifest.xml. You need to add a meta-data item defining the face dependency under the application node of your manifest. This lets the Vision library know that you plan to detect faces within your application.
<meta-data android:name="com.google.android.gms.vision.DEPENDENCIES" android:value="face"/>
Once you're finished setting up AndroidManifest.xml, you can go ahead and close it. Next, you need to create a new class named FaceOverlayView.java. This class extends View and contains the logic for detecting faces in the project, displaying the bitmap that was analyzed and drawing on top of the image in order to illustrate points.
For now, start by adding the member variables at the top of the class and defining the constructors. The Bitmap object will be used to store the bitmap that will be analyzed and the SparseArray of Face objects will store each face found in the bitmap.
public class FaceOverlayView extends View {

    private Bitmap mBitmap;
    private SparseArray<Face> mFaces;

    public FaceOverlayView(Context context) {
        this(context, null);
    }

    public FaceOverlayView(Context context, AttributeSet attrs) {
        this(context, attrs, 0);
    }

    public FaceOverlayView(Context context, AttributeSet attrs, int defStyleAttr) {
        super(context, attrs, defStyleAttr);
    }
}
Next, add a new method inside of FaceOverlayView called setBitmap(Bitmap bitmap). For now this will simply save the bitmap passed to it, however later you will use this method for analyzing the image.
public void setBitmap( Bitmap bitmap ) {
    mBitmap = bitmap;
}
Next, you need a bitmap. I have included one in the sample project on GitHub, but you can use any image that you would like in order to play with Face Detection and see what works and what doesn't. When you have selected an image, place it into the res/raw directory. This tutorial will assume that the image is called face.jpg.
After you have placed your image into the res/raw directory, open res/layout/activity_main.xml. This layout contains a reference to FaceOverlayView so that it is displayed in MainActivity.
<?xml version="1.0" encoding="utf-8"?>
<com.tutsplus.facedetection.FaceOverlayView
    xmlns:android="http://schemas.android.com/apk/res/android"
    android:id="@+id/face_overlay"
    android:layout_width="match_parent"
    android:layout_height="match_parent" />
With the layout defined, open MainActivity and set up the FaceOverlayView from onCreate(). You do this by getting a reference to the view, reading the face.jpg image file from the raw directory as an input stream, and converting that into a bitmap. Once you have the bitmap, you can call setBitmap on the FaceOverlayView to pass the image to your custom view.
public class MainActivity extends AppCompatActivity {

    private FaceOverlayView mFaceOverlayView;

    @Override
    protected void onCreate(Bundle savedInstanceState) {
        super.onCreate(savedInstanceState);
        setContentView(R.layout.activity_main);
        mFaceOverlayView = (FaceOverlayView) findViewById( R.id.face_overlay );

        InputStream stream = getResources().openRawResource( R.raw.face );
        Bitmap bitmap = BitmapFactory.decodeStream(stream);

        mFaceOverlayView.setBitmap(bitmap);

    }
}
2. Detecting Faces
Now that your project is set up, it's time to start detecting faces. In setBitmap( Bitmap bitmap ) you need to create a FaceDetector. This can be done using a FaceDetector.Builder, allowing you to define multiple parameters that affect how fast faces will be detected and what other data the FaceDetector will generate.
The settings that you pick depend on what you're attempting to do in your application. If you enable searching for landmarks, then faces will be detected more slowly. As with most things in programming, everything has its trade-offs. To learn more about the options available for FaceDetector.Builder, you can find the official documentation on Android's developer website.
FaceDetector detector = new FaceDetector.Builder( getContext() )
        .setTrackingEnabled(false)
        .setLandmarkType(FaceDetector.ALL_LANDMARKS)
        .setMode(FaceDetector.FAST_MODE)
        .build();
You also need to have a check to see if the FaceDetector is operational. When a user uses face detection for the first time on their device, Play Services needs to go out and get a set of small native libraries to process your application's request. While this will almost always be done before your app has finished launching, it is important to handle the contingency that this has failed.
If the FaceDetector is operational, then you can convert your bitmap into a Frame object and pass it to the detector to gather data about faces in the image. When you are done, you will need to release the detector to prevent a memory leak. When you are finished detecting faces, call invalidate() to trigger redrawing the view.
if (!detector.isOperational()) {
    //Handle contingency
} else {
    Frame frame = new Frame.Builder().setBitmap(bitmap).build();
    mFaces = detector.detect(frame);
    detector.release();
}
invalidate();
Now that you have detected the faces in your image, it's time to use them. For this example, you will simply draw a green box around each face. Since invalidate() was called after the faces were detected, you can add all of the necessary logic into onDraw(Canvas canvas). This method ensures that the bitmap and faces are set, then draw the bitmap onto the canvas, and then draw a box around each face.
Since different devices have different display sizes, you will also keep track of the bitmap's scaled size so that the entire image is always visible on the device and all overlays are drawn appropriately.
@Override
protected void onDraw(Canvas canvas) {
    super.onDraw(canvas);

    if ((mBitmap != null) && (mFaces != null)) {
        double scale = drawBitmap(canvas);
        drawFaceBox(canvas, scale);
    }
}
The drawBitmap(Canvas canvas) method draws your bitmap onto the canvas and sizes it appropriately while also returning a multiplier for scaling your other dimensions correctly.
private double drawBitmap( Canvas canvas ) {
    double viewWidth = canvas.getWidth();
    double viewHeight = canvas.getHeight();
    double imageWidth = mBitmap.getWidth();
    double imageHeight = mBitmap.getHeight();
    double scale = Math.min( viewWidth / imageWidth, viewHeight / imageHeight );

    Rect destBounds = new Rect( 0, 0, (int) ( imageWidth * scale ), (int) ( imageHeight * scale ) );
    canvas.drawBitmap( mBitmap, null, destBounds, null );
    return scale;
}
The drawFaceBox(Canvas canvas, double scale) method gets a little more interesting. Each face that was detected and saved has a position value above and to the left of each face. This method will take that position and draw a green rectangle from it to encompass each face based on its width and height.
You need to define your Paint object and then loop through each Face in your SparseArray to find its position, width, and height, and draw the rectangle on the canvas using that information.
private void drawFaceBox(Canvas canvas, double scale) {
    //paint should be defined as a member variable rather than
    //being created on each onDraw request, but left here for
    //emphasis.
    Paint paint = new Paint();
    paint.setColor(Color.GREEN);
    paint.setStyle(Paint.Style.STROKE);
    paint.setStrokeWidth(5);

    float left = 0;
    float top = 0;
    float right = 0;
    float bottom = 0;

    for( int i = 0; i < mFaces.size(); i++ ) {
        Face face = mFaces.valueAt(i);

        left = (float) ( face.getPosition().x * scale );
        top = (float) ( face.getPosition().y * scale );
        right = (float) scale * ( face.getPosition().x + face.getWidth() );
        bottom = (float) scale * ( face.getPosition().y + face.getHeight() );

        canvas.drawRect( left, top, right, bottom, paint );
    }
}
At this point, you should be able to run your application and see your image with rectangles around each face that has been detected. It is important to note that the Face Detection API is still fairly new at the time of this writing and it may not detect every face. You can play with some of the settings in the FaceDetector.Builder object in order to hopefully gather more data, though it's not guaranteed.

3. Understanding Landmarks
Landmarks are points of interest on a face. The Face Detection API does not use landmarks for detecting a face, but rather detects a face in its entirety before looking for landmarks. That is why discovering landmarks is an optional setting that can be enabled through the FaceDetector.Builder.
You can use these landmarks as an additional source of information, such as where the subject's eyes are, so that you can react appropriately within your app. There are twelve landmarks that are possible to find:
- left and right eye
- left and right ear
- left and right ear tip
- base of the nose
- left and right cheek
- left and right corner of the mouth
- base of the mouth
The landmarks that are available depend on the angle of the face detected. For example, someone facing off to the side will only have one eye visible, which means that the other eye will not be detectable. The following table outlines which landmarks should be detectable based on the Euler Y angle (direction left or right) of the face.
| Euler Y | Visible Landmarks |
|---|---|
| < -36° | left eye, left mouth, left ear, nose base, left cheek |
| -36° to -12° | left mouth, nose base, bottom mouth, right eye, left eye, left cheek, left ear tip |
| -12° to 12° | right eye, left eye, nose base, left cheek, right cheek, left mouth, right mouth, bottom mouth |
| 12° to 36° | right mouth, nose base, bottom mouth, left eye, right eye, right cheek, right ear tip |
| > 36° | right eye, right mouth, right ear, nose base, right cheek |
Landmarks are also incredibly easy to use in your application as you've already included them during face detection. You simply need to call getLandmarks() on a Face object to get a List of Landmark objects that you can work with.
In this tutorial, you will paint a small circle on each detected landmark by calling a new method, drawFaceLandmarks(Canvas canvas, double scale), from onDraw(canvas canvas) instead of drawFaceBox(Canvas canvas, double scale). This method takes the position of each landmark, adjusts it for the scale of the bitmap, and then displays the landmark indicator circle.
private void drawFaceLandmarks( Canvas canvas, double scale ) {
    Paint paint = new Paint();
    paint.setColor( Color.GREEN );
    paint.setStyle( Paint.Style.STROKE );
    paint.setStrokeWidth( 5 );

    for( int i = 0; i < mFaces.size(); i++ ) {
        Face face = mFaces.valueAt(i);

        for ( Landmark landmark : face.getLandmarks() ) {
            int cx = (int) ( landmark.getPosition().x * scale );
            int cy = (int) ( landmark.getPosition().y * scale );
            canvas.drawCircle( cx, cy, 10, paint );
        }

    }
}
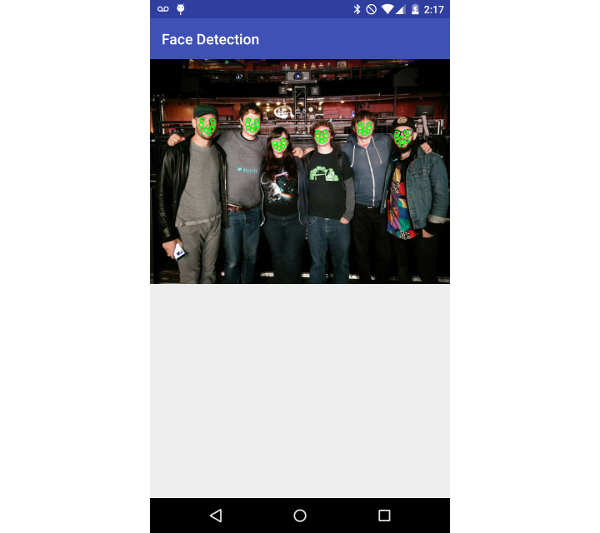
After calling this method, you should see small green circles covering the detected faces as shown in the example below.
4. Additional Face Data
While the position of a face and its landmarks are useful, you can also find out more information about each face detected in your app through some built-in methods from the Face object. The getIsSmilingProbability(), getIsLeftEyeOpenProbability() and getIsRightEyeOpenProbability() methods attempt to determine if eyes are open or if the person detected is smiling by returning a float ranging from 0.0 to 1.0. The closer to 1.0, the more likely that person is smiling or has their left or right eye open.
You can also find the angle of the face on the Y and Z axes of an image by checking its Euler values. The Z Euler value will always be reported, however, you must use accurate mode when detecting faces in order to receive the X value. You can see an example of how to get these values in the following code snippet.
private void logFaceData() {
    float smilingProbability;
    float leftEyeOpenProbability;
    float rightEyeOpenProbability;
    float eulerY;
    float eulerZ;
    for( int i = 0; i < mFaces.size(); i++ ) {
        Face face = mFaces.valueAt(i);

        smilingProbability = face.getIsSmilingProbability();
        leftEyeOpenProbability = face.getIsLeftEyeOpenProbability();
        rightEyeOpenProbability = face.getIsRightEyeOpenProbability();
        eulerY = face.getEulerY();
        eulerZ = face.getEulerZ();

        Log.e( "Tuts+ Face Detection", "Smiling: " + smilingProbability );
        Log.e( "Tuts+ Face Detection", "Left eye open: " + leftEyeOpenProbability );
        Log.e( "Tuts+ Face Detection", "Right eye open: " + rightEyeOpenProbability );
        Log.e( "Tuts+ Face Detection", "Euler Y: " + eulerY );
        Log.e( "Tuts+ Face Detection", "Euler Z: " + eulerZ );
    }
}
Conclusion
In this tutorial, you have learned about one of the main components of the Play Services Vision library, Face Detection. You now know how to detect faces in a still image, how to gather information, and find important landmarks for each face.
Using what you have learned, you should be able to add some great features to your own apps for augmenting still images, tracking faces in a video feed, or anything else you can imagine.

Comments