Automated testing is known to be very valuable to any programmer. It is a tool that allows the simulation of a person’s actions on a specific device and it’s favored because it lacks the errors or speed limitations of an actual person.
Appium is an automated testing tool, based on the popular testing framework Selenium, that enables automated testing on both native iOS and Android apps. Its main limitation is that it is only built for OS X and Linux.
At my office, we use Appium for regression testing. Regression testing simply means testing existing features to ensure they continue to function as expected as the product grows. It’s very important to know when features break so that progress can continue in a linear fashion.
In this tutorial, I'll show you how to set up Appium, generate automated scripts, and create a few simple login tests for an Android application.
1. Appium Setup
Getting Appium doesn't take much time, but it’s easy to mess up the setup. The first time I installed Appium, I naively downloaded the application (.dmg) before setting it up on the command line. It turns out that if you download the application first, it may make getting Appium on the command line quite difficult. So start by getting Appium from the command line.
In the following steps, I am assuming you have homebrew installed and are using a OS X. If you don’t have node installed, executed the following command from the command line:
$ brew install node
Next, install Appium using the node package manager. It's important that you do not use sudo for these commands or Appium will not work.
$ npm install -g appium
$ npm install wd
If you don’t have the permissions to use these commands, you’ll have to chmod them yourself rather than sudo. The location of the folder may be different for you, depending on your setup.
$ sudo chmod -R a+w /usr/local
To run the Appium server and see if you have set it up correctly, execute the following command from the command line.
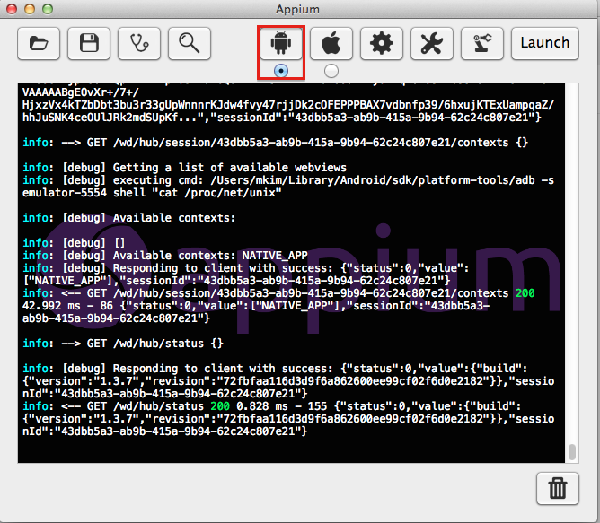
$ appium &
Appium on the command line allows you to run Selenium tests not only on Android and iOS simulators, but also on physical devices. The application has a nice user interface that allows you to run a simulated version of your AUT (Application Under Testing) and easily generate Selenium code for simple actions on the application. You will mainly use the application in the initial phase of creating tests and then use the command line for running tests.
Why don't we use the application for the entire flow? If you plan on running a suite of tests on various devices in an automated fashion, perhaps on a schedule, being able to run Appium from the command line will be essential.
The Appium application can be downloaded from Bitbucket. After downloading the disk image, double-click it and drag the Appium application to your Applications folder.
2. AUT Setup
Next, we need an application to test. For this introduction to Appium, we will test a native Android application that I’m calling AUT. It is a very simple login and logout application. On a successful login, it’ll bring us to a page that tells us we successfully logged in, displaying a logout button.
Many apps have a login feature so we will create a basic suite of login tests to test the possible outcomes of a user interacting with the login flow. It’s not so much that we want to make sure that login works, we want to test the app’s response to the various ways a user can fail to login, for example, by entering invalid credentials.
Since it's impossible to own every available Android device, I usually test on simulated devices. This allows me to easily change which device is being simulated for compatibility testing. To get an Android simulator, get AVD Manager and set up any Android device of your choosing, compatible with API level 21.
- Download the APK from GitHub.
- Get JDK, if you don’t already have it.
- Get the Android SDK with the AVD Manager.
- Set the
ANDROID_HOME,JAVA_HOME, andPATHenvironment variables in your .profile or .bash_profile (or .zshrc if you use zsh).
ANDROID_HOME should point to the location of the Android sdk while JAVA_HOME should point to the location of the JDK.
This is how you can add these paths to your .bash_profile. Note that the paths may be different for you.
$ vim ~/.bash_profile
$ export ANDROID_HOME=/Users/(username)/Library/Android/sdk
$ export PATH=$PATH:$ANDROID_HOME/tools:$ANDROID_HOME/platform-tools
$ export JAVA_HOME=/Library/Java/JavaVirtualMachines/jdk1.8.0_40.jdk/Contents/Home
Next, create a simulated device with the AVD Manager. Make sure to enable Use host GPU and set the VM Heap to 64.
$ cd $ANDROID_HOME/tools
$ ./android avd
To make the simulator run faster, install HAX from Intel's website.
3. Appium Inspector
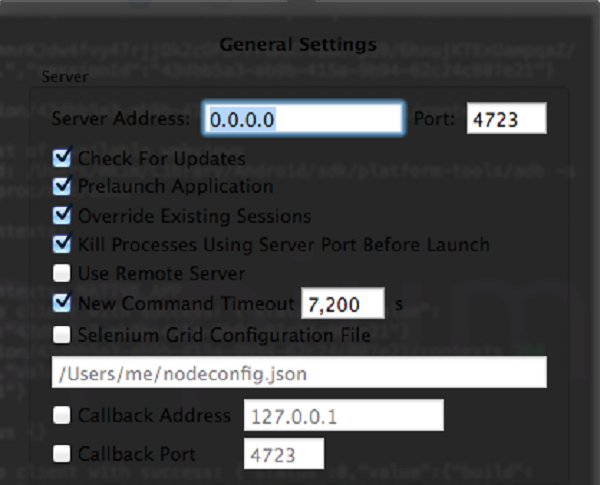
It's time to use the Appium Inspector and start writing some tests. Launch the Appium application. In General Settings, uncheck Check for Updates, Prelaunch Application, Override Existing Sessions, and Kill Processes Using Server Port Before Launch.
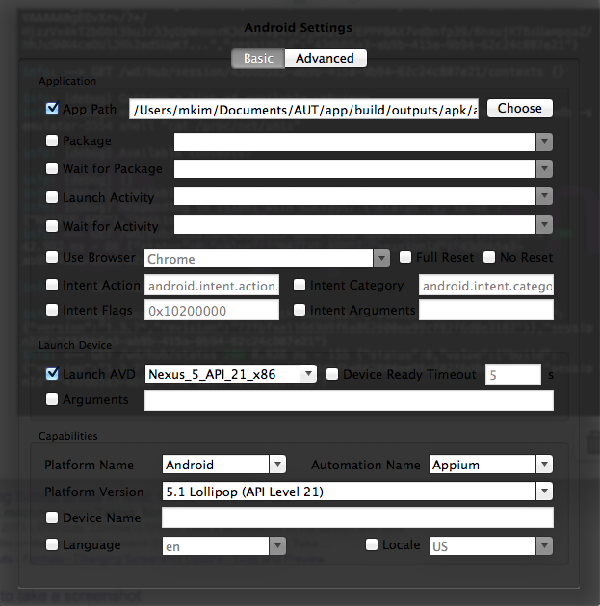
Next, check the Android Radio Button and click the Android Icon. Check App Path and set its value to the location of where you put the APK of the application under test. Check Launch AVD and select the simulated device. Choose 5.1 Lollipop (API Level 21) from the dropdown menu from Platform Version.
Hit Launch and wait for the app to launch on the simulated device.
You may run into an issue where the application crashes on unlock since we’re using the brand new API 21. To resolve this, launch the application again after manually unlocking the simulated screen.
Once the simulated device has launched the app, hit the Magnifying Glass icon to launch the inspector.
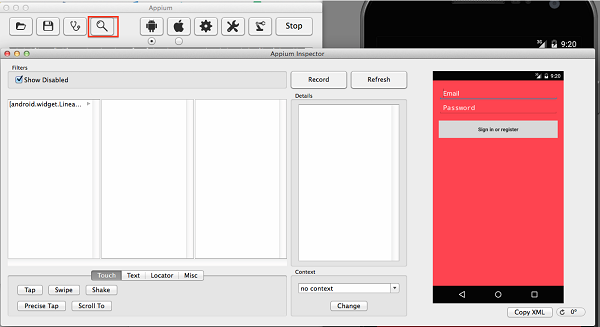
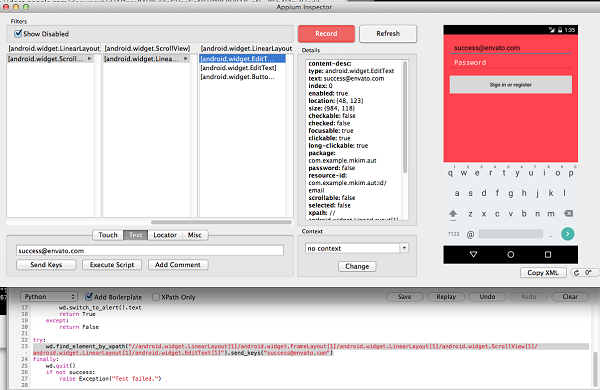
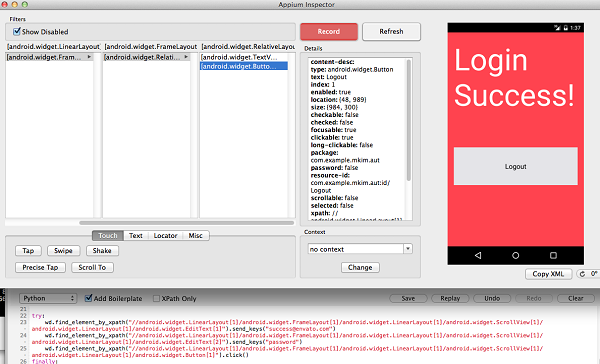
This is the Appium inspector. It’s a very convenient tool to help you get started with writing tests for Appium. Essentially, the inspector allows you to perform actions on the native Android application and record your actions as generated code.
The boxes on the left side of the inspector make up the UI Navigator and allow you to navigate the elements of the current activity. At the bottom are the options to interact with the element selected from the element boxes. Details of the selected element are shown in Details. If you do something manually to the simulation, you must hit Refresh for the inspector to recognize those changes. If you want to start to record your actions in code, you must hit the Record button.
Let’s create the code necessary for a successful login. The app has two hardcoded logins, [email protected]:password and [email protected]:password2.
- Clicking Record and observe that there's now code below the inspector. You can choose different languages for this to show in. For this tutorial, we will use Python.
- In the UI Navigator navigate to android.widget.LinearLayout/android.widget.FrameLayout/
android.widget.LinearLayout/android.widget.ScrollView/
android.widget.LinearLayout/android.widget.EditText[1]. - Click Text at the bottom and enter [email protected].
- Click Send Keys, and observe that the code below now has a new line.
5. In the UI Navigator, navigate to android.widget.LinearLayout/
android.widget.FrameLayout/android.widget.LinearLayout/
android.widget.ScrollView/android.widget.LinearLayout/
android.widget.EditText[2]
6. Enter the password.
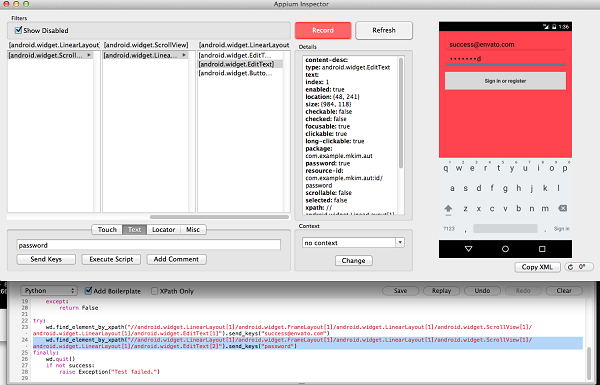
7. Click Send Keys.
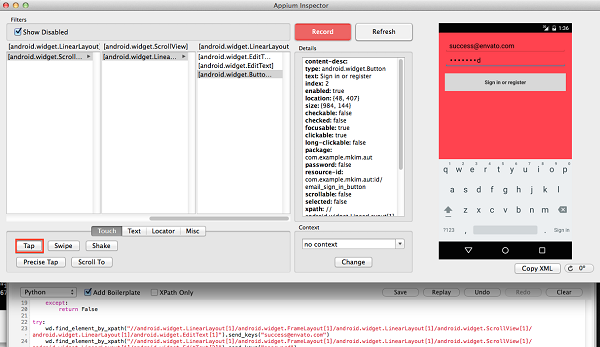
8. In the UI Navigator, navigate to android.widget.LinearLayout/android.widget.FrameLayout/
android.widget.LinearLayout/android.widget.ScrollView/
android.widget.LinearLayout/android.widget.Button[1]
9. Click Touch at the bottom, followed by Tap. We're now at a new activity so the UI Navigator has changed.
10. Hit Refresh since the inspector probably hasn't realized that the simulator is past the loading screen now.
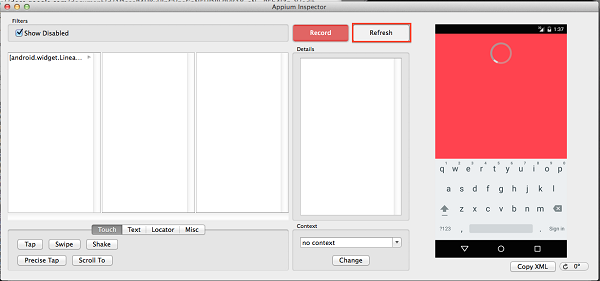
11. In the UI Navigator navigate to android.widget.LinearLayout/android.widget.FrameLayout/
android.widget.RelativeLayout/android.widget.Button[1].
12. Click Tap.
In the code below, we have all the code to simulate a successful login. Feel free to play a bit more with the inspector. Later in this tutorial, we will also be writing tests for unsuccessful logins.
4. Login Tests
We will now write some tests using Appium to make sure our login page works as it should. If you don't have Python, then you can download it from the official website.
To use the Appium web driver with Python, you must also get the Appium libraries for Python.
- Download and unarchive the .gz file.
- Open the .gz file, navigate to the location on the command line, and execute the following command:
$ python setup.py install
Before we start writing the tests, we'll need to decide which test cases we will be making. A good test suite should consider every possible interaction. Let's start with a simple one.
- A successful login.
- An unsuccessful login.
#!/usr/bin/python

from appium import webdriver
import time
import unittest
import os
First, we must import everything we need for the test. We will use the built-in Python unit test to run our tests. The Appium element is the web driver, which we will use to interact with the Appium server.
class LoginTests(unittest.TestCase):
    def setUp(self):
        desired_caps = {}
        desired_caps['appium-version'] = '1.0'
        desired_caps['platformName'] = 'Android'
        desired_caps['platformVersion'] = '5.1'
        desired_caps['app'] = os.path.abspath('/Users/mkim/Documents/AUT/app/build/outputs/apk/app-debug-unaligned.apk')

        self.wd = webdriver.Remote('http://0.0.0.0:4723/wd/hub', desired_caps)
        self.wd.implicitly_wait(60)
We create a class LoginTests to define our suite of tests. The setUp function of our unit test runs at the start of the test. In this method, we set the desired capabilities, such as Android and the app path. We then initialize the web driver self.wd by connecting to the Appium server.
    def tearDown(self):
        self.wd.quit()
The tearDown function runs after a test and it disconnects from the Appium server.
    def test_success(self):
        basepath = "//android.widget.LinearLayout[1]/android.widget.FrameLayout[1]/android.widget.LinearLayout[1]/android.widget.ScrollView[1]/android.widget.LinearLayout[1]/"
        basepath2 = "//android.widget.LinearLayout[1]/android.widget.FrameLayout[1]/android.widget.RelativeLayout[1]/"
    self.wd.find_element_by_xpath(basepath + "android.widget.EditText[1]").send_keys("[email protected]")
	self.wd.find_element_by_xpath(basepath + "android.widget.EditText[2]").send_keys("password")
	self.wd.find_element_by_xpath(basepath + "android.widget.Button[1]").click()
        try:
	    self.wd.find_element_by_xpath(basepath2 + "android.widget.TextView[1]")
        except:
            self.fail("Not at Login Success page.\n")

	self.wd.find_element_by_xpath(basepath2 + "android.widget.Button[1]").click()
The above code block is mostly copied from the Appium inspector code. We perform the required actions on the user interface for a successful login. In the try clause, we try to find the textView element that displays the text Login Success! If an exception is thrown, the test fails.
    def test_fail(self):
        basepath = "//android.widget.LinearLayout[1]/android.widget.FrameLayout[1]/android.widget.LinearLayout[1]/android.widget.ScrollView[1]/android.widget.LinearLayout[1]/"
    self.wd.find_element_by_xpath(basepath + "android.widget.EditText[1]").send_keys("[email protected]")
	self.wd.find_element_by_xpath(basepath + "android.widget.EditText[2]").send_keys("wrongpassword")
	self.wd.find_element_by_xpath(basepath + "android.widget.Button[1]").click()
        try:
	    self.wd.find_element_by_xpath(basepath + "android.widget.Button[1]")
        except:
            self.fail("Not still at login screen.\n")
To fail the login test, we deliberately use an incorrect password, wrongpassword, expecting the login to fail. We check if we can find the login button element and fail the test if we cannot.
if __name__ == '__main__':
    suite = unittest.TestLoader().loadTestsFromTestCase(LoginTests)
    unittest.TextTestRunner(verbosity=2).run(suite)
This is the main function needed to run our tests. There's nothing wrong with our first test case. However, an unsuccessful login could mean many things. When a user is unable to log in, we want to make sure the user interface is helping them realize how to fix their mistake for a better user experience.
- A successful login.
- Login with incorrect password.
- Login with incorrect email.
- Login with no password.
- Login with no email.
- Login with an invalid email.
We've expanded our test cases from two to six test cases for the login page. It might seem like a lot for such a simple feature, but it's absolutely necessary.
The most difficult part of writing tests is checking expectations. For example, the failed login test checks if an element exists in the user interface. This means that the login tests completely rely on the user interface to tell us whether the requirements are met.
This could be a bad thing since the user interface doesn't tell us everything about the underlying code. However, the goal is to test the user interface so to have an expectation check that a user interface element exists is proper. We could make our expectation more thorough by checking that every expected element is present on the page or even by checking that every element is correctly positioned.
Conclusion
We've learned how to:
- set up Appium
- use Appium's inspector to help creating automated test scripts
- use automation to create a few simple login tests for an Android application
There is much more to be learned about Appium and testing. The next step might be to create a continuously integrated testing system that utilizes the capabilities of Appium for your own applications.

Comments