WooCommerce is arguably the most popular way to sell products using WordPress. With WordPress powering roughly 25% of the Internet and WooCommerce powering roughly 39% of all online stores, it's a safe bet to use the two in conjunction with one another if you're looking to market goods to customers.
But, as with any software, there are times where we or our clients often want to extend the feature set beyond what's offered out of the box.
Case in point: With WooCommerce, let's say that you have a simple product that you want to sell but you want to include a little more information about the product to display on the front-end.
Using a couple of hooks provided by WooCommerce and custom functionality that we'll write, we'll take a look at how we can do exactly that.
Required Tools
Before we get started, I assume that you have the following setup (or something comparable) on your machine:
- Your operating system of choice—I'll be using macOS
- At least PHP 5.6.25, though I'll be using PHP 7
- MySQL 5.6.33
- Apache or Nginx
- WordPress 4.7
- WooCommerce 3.9
- Your favorite IDE
For the rest of the tutorial, I assume that all of this is installed, activated, and running.
If you download WooCommerce specifically for this tutorial, there's no need to worry about things like the checkout pages, terms and conditions, or anything like that. In fact, we're only going to be focused on the Simple Product meta box throughout the rest of this tutorial.
Adding Custom Fields
When it comes to working with WordPress, the notion of custom fields usually carries with it a different definition:
WordPress has the ability to allow post authors to assign custom fields to a post. This arbitrary extra information is known as meta-data.
For non-developers, this type of information can be a bit more complex and unnecessary. But if you're used to working with it, then it's important to note that when I refer to custom fields in this tutorial, I'm talking about something completely different.
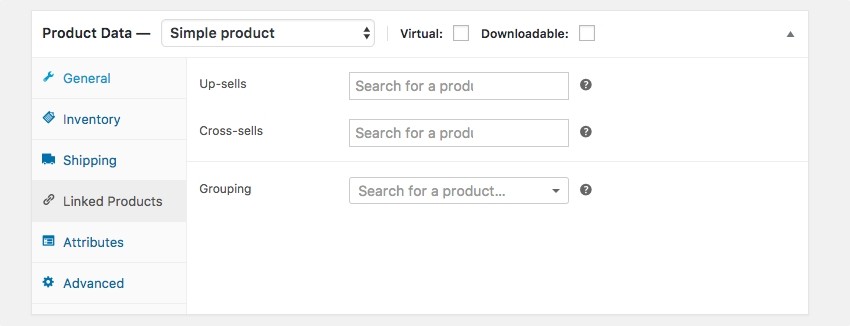
Instead, I'm talking about an actual text field that we'll introduce into the Linked Product tab of the Simple Product type.
But we'll get to that later in the tutorial. For now, let's get started.
1. The Hooks
Much like WordPress, WooCommerce provides an API that allows us to hook into part of its page lifecycle. So although you may have worked with the WordPress metadata API before, doing so with WooCommerce is different.
There are two hooks that are important to know:
- woocommerce_product_options_grouping. We'll use this function to create a description and text input that will accept our values.
- woocommerce_process_product_meta. We'll use this hook to process, sanitize, and save the value of our text input.
As with all hooks in WordPress, these will require that we define these hooks and then define custom functionality for them. Though you can do this using procedural programming, this tutorial will be implementing the functionality using object-oriented programming.
2. The Functionality
First, we'll define a class that will have a since variable as its instance data. This variable will represent the ID of the input field that will appear in the user interface:
<?php

class TutsPlus_Custom_WooCommerce_Field {

    private $textfield_id;
}
Next, we'll initialize this instance variable in the constructor of the class:
<?php

class TutsPlus_Custom_WooCommerce_Field {

    private $textfield_id;

    public function __construct() {
        $this->textfield_id = 'tutsplus_text_field';
    }
}
At this point, we're ready to begin using the hooks listed above. To do this, though, we'll add an initialization function that will register two custom functions with the hook.
In the following two sections, we'll see exactly how to implement the custom functionality.
1. Adding a Text Input Field
First, we'll want to add a function that's hooked to woocommerce_product_options_grouping. In the init function that we defined in the previous section, we'll do exactly that.
<?php

class TutsPlus_Custom_WooCommerce_Field {

	private $textfield_id;

	public function __construct() {
		$this->textfield_id = 'tutsplus_text_field';
	}

	public function init() {

            add_action(
                'woocommerce_product_options_grouping',
                array( $this, 'product_options_grouping' )
            );
	}

	public function product_options_grouping() {

	}
}
Notice that I've named the function product_options_grouping. I find doing this makes the code a bit easier to read. Though the function, on its own, may not be highly descriptive of what the function does, it relates itself to its respective hook.
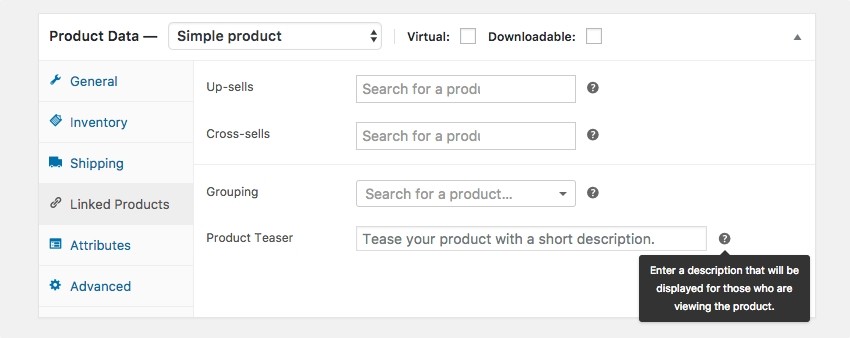
Next, we need to implement the function. To do this, we'll need some information:
- We'll need an ID that we'll use to uniquely identify the text field. We'll use the instance data set in the constructor.
- A label will be used to give some description to the input field.
- We can optionally specify a placeholder, and for the purposes of our example, we will.
- There's an option to display a tooltip whenever the user hovers their mouse over an icon.
- And we have the option for a description that we'll use to populate the text of the tooltip.
All of the above information will be set in an associative array and will then be passed to woocommerce_wp_text_input. This is a WooCommerce API function designed to output a text element with the above arguments.
<?php

class TutsPlus_Custom_WooCommerce_Field {

        private $textfield_id;

	public function __construct() {
		$this->textfield_id = 'tutsplus_text_field';
	}

	public function init() {

            add_action(
                'woocommerce_product_options_grouping',
                array( $this, 'product_options_grouping' )
            );
	}

	public function product_options_grouping() {

            $description = sanitize_text_field( 'Enter a description that will be displayed for those who are viewing the product.' );
            $placeholder = sanitize_text_field( 'Tease your product with a short description.' );

            $args = array(
                'id'            => $this->textfield_id,
                'label'	        => sanitize_text_field( 'Product Teaser' ),
                'placeholder'   => 'Tease your product with a short description',
                'desc_tip'      => true,
                'description'   => $description,
            );
            woocommerce_wp_text_input( $args );
	}
}
At this point, we have the first part of the plugin done. We've yet to write the code that sets everything in motion, and we've yet to write the code that saves the information to the database, so let's take care of that now.
2. Saving the Information
Next, add the following lines of code into the init method:
<?php

add_action(
    'woocommerce_process_product_meta',
    array( $this, 'add_custom_linked_field_save' )
);
After that, be sure to add the add_custom_linked_field_save function.
<?php

public function add_custom_linked_field_save( $post_id ) {

        if ( ! ( isset( $_POST['woocommerce_meta_nonce'], $_POST[ $this->textfield_id ] ) || wp_verify_nonce( sanitize_key( $_POST['woocommerce_meta_nonce'] ), 'woocommerce_save_data' ) ) ) {
		return false;
	}

	$product_teaser = sanitize_text_field(
		wp_unslash( $_POST[ $this->textfield_id ] )
	);

	update_post_meta(
		$post_id,
		$this->textfield_id,
		esc_attr( $product_teaser )
	);
}
I'll talk a bit about the implementation of the function in the next section.
Sanitizing the Data
Notice in the function above, there are three things happening:
- We check to make sure several nonce values are present. If not, then we return
false. This is a standard security precaution. The nonce values are detected by looking specifically at what WooCommerce provides in the source code. - Sanitize the data in the
$_POSTcollection corresponding with the user's input. - Save the information to the post metadata table.
Note that we don't actually do anything to render the information on the front-end yet so there's no call to get_post_meta. This is, however, how we'll render information on the front-end.
3. Displaying the Teaser on the Front-End
To render information on the front-end, we're going to need a class that will do a lot of the same work we've already done. Specifically, we'll need:
- a textfield ID
- initialization of said ID in the constructor
- an initialization function for hooking our custom code to the front-end
- rendering the actual value
Setting this up isn't actually that difficult since we've already done this, so I'm going to pass the class in its entirety below; however, I'll have a few comments to make about the way we're going about setting this class up after the jump:
<?php

class TutsPlus_Custom_WooCommerce_Display {

	private $textfield_id;

	public function __construct() {
		$this->textfield_id = 'tutsplus_text_field';
	}

	public function init() {

		add_action(
			'woocommerce_product_thumbnails',
			array( $this, 'product_thumbnails' )
		);
	}

	public function product_thumbnails() {

		$teaser = get_post_meta( get_the_ID(), $this->textfield_id, true );
		if ( empty( $teaser ) ) {
			return;
		}

		echo esc_html( $teaser );
	}
}
The end result should be something like this:

At this point, we have some redundant code. Specifically, the public and the administrative classes both use a textfield_ID and set it up in their constructor. This is a code smell as it violates the whole DRY principle of object-oriented programming.
There are a number of ways that we could mitigate this, such as passing the value into the constructors when the classes are instantiated, using a simple design pattern to orchestrate information between the two classes, and so on.
In the file that accompanies this tutorial, which can be downloaded using the link in the sidebar, you'll actually see how I've passed the value into the constructor to make it a bit easier to manage.
Secondly, note that I'm using the woocommerce_product_thumbnails hook to help render the information. There are a number of hooks WooCommerce made available, and I simply chose this one from the available hooks to render it. You can feel free to pore through the documentation to determine which hook works best for your needs.
4. Bringing It All Together
Finally, the last thing we need to do is to set up a bootstrap file that will start the plugin. We've done this in a number of my previous tutorials so I'm not going to spend too much time belaboring the point.
Here's the code for how I'm breaking it up:
<?php
/**
 * The plugin bootstrap file
 *
 * This file is read by WordPress to generate the plugin information in the
 * plugin admin area. This file also includes all of the dependencies used by
 * the plugin, and defines a function that starts the plugin.
 *
 * @link              http://code.tutsplus.com/tutorials/adding-custom-fields-to-simple-products-with-woocommerce--cms-27904
 * @package           CWF
 *
 * @wordpress-plugin
 * Plugin Name:       Tuts+ Custom WooCommerce Field
 * Plugin URI:        http://code.tutsplus.com/tutorials/adding-custom-fields-to-simple-products-with-woocommerce--cms-27904
 * Description:       Demonstrates how to add a custom field to a Simple Product.
 * Version:           1.0.0
 * Author:            Tom McFarlin
 * Author URI:        https://tommcfarlin.com
 * License:           GPL-2.0+
 * License URI:       http://www.gnu.org/licenses/gpl-2.0.txt
 */

defined( 'WPINC' ) || die;

include_once 'admin/class-tutsplus-custom-woocommerce-field.php';
include_once 'public/class-tutsplus-custom-woocommerce-display.php';

add_action( 'plugins_loaded', 'tutsplus_wc_input_start' );
/**
 * Start the plugin.
 */
function tutsplus_wc_input_start() {

    if ( is_admin() ) {

        $admin = new TutsPlus_Custom_WooCommerce_Field( 'tutsplus_text_field' );
        $admin->init();
    } else {

        $plugin = new TutsPlus_Custom_WooCommerce_Display( 'tutsplus_text_field' );
        $plugin->init();
    }
}
Notice that I include the dependencies and then, once the function fires, I check to see if the dashboard is being displayed or not. If so, then the proper part of the plugin is loaded; otherwise, the standard display is loaded, which you can see on the product page.
Conclusion
At this point, we've covered everything we set out to do in the introduction of the tutorial:
- We've added a custom field.
- We've sanitized and saved it.
- We've set up a public-facing aspect of the plugin.
- And we've retrieved and displayed the content.
Don't forget to download the final working demo from the sidebar of this page. It's the large blue button in the sidebar. Furthermore, if you're interested in WooCommerce, don't forget to check out some of our other tutorials or some of the items we have in our marketplace.
As usual, if you're looking for other WordPress-related material, you can find all of my previous tutorials on my profile page, and you can follow me on my blog or on Twitter.
Don't forget to leave any questions or comments in the feed below!

Comments