Curious about 3D game development? Now is the time to learn! This five-part tutorial series will demonstrate how to build a simple game with ShiVa3D Suite, a cross-platform 3D game engine and authoring tool. This is the fourth installment of the series, where you will complete the AI Model programming for the game and learn how to create unit tests to check your work.
Developing the Game in the ShiVa Editor - Continued
In part 3, we learned how to edit the scene of our application. We also started entering the code for the AIModels of the game and completed the coding for the DuckAI. In part 4, we will finish the coding for the remaining AIModels, EggAI and the MainAI, and perform unit testing by animating the game. We will then export the game from the ShiVa Editor for importing into the Shiva Authoring Tool. Finally, we will discuss two different authoring options in the Shiva Authoring Tool: one for generating an Android executable and another one for generating an Eclipse project.
Enter Variables and Code for the EggAI
In the AIModel Editor, select the EggAI tab. (If you do not see the EggAI tab, bring the AIModel Editor and the Data Explorer side by side. Then, go to Data Explorer -> Resources -> AIModels and double-click on EggAI. This should display EggAI in a tab in AIModel Editor.)
Add two variables to EggAI:
- name: isBack, type: boolean, Init Value: true
- name: jump, type: number, Init Value: 0
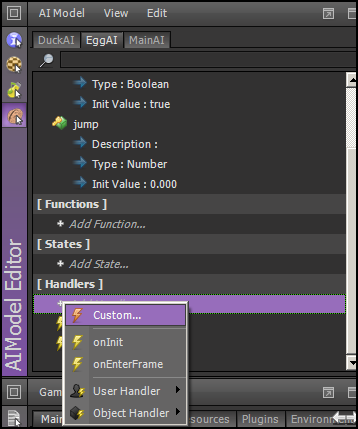
Add the handlers onInit and onEnterFrame as we did previously. Also, add a custom handler by selecting Add Handler -> Custom as shown below.
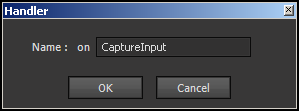
Name the custom handler 'onCaptureInput.' Note: it is important that you do not type 'on' because it is added by the dialog as shown below.
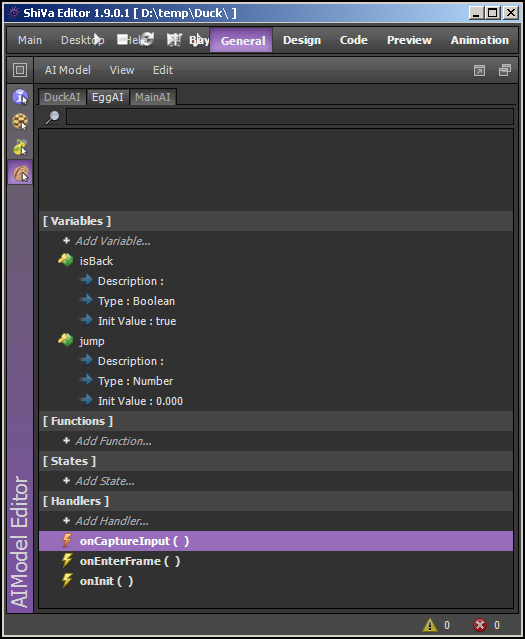
You should see the following.
Now bring the AIModel Editor and Script Editor side by side, as we did before. On AIModel Editor, select the EggAI tab. By double-clicking on onInit, onEnterFrame, and onCaptureInput one by one, bring the corresponding code in Script Editor and replace them with the following. In each case, do not forget to save the scripts in the Script Editor via Control+S.
For onInit:
function EggAI.onInit (  )
--------------------------------------------------------------------------------
	object.setTranslation ( this.getObject ( ), 0, 3, 0, object.kGlobalSpace )
--------------------------------------------------------------------------------
end
--------------------------------------------------------------------------------
For onEnterFrame:
function EggAI.onEnterFrame (  )
--------------------------------------------------------------------------------
    local lObject = this.getObject ( )

    local x,y,z = object.getRotation(lObject,object.kLocalSpace)
    object.setRotation (lObject,x+1,y,z, object.kLocalSpace  )

    local xp, yp, zp = object.getTranslation ( this.getObject ( ) , object.kGlobalSpace )
    if(zp < -5)
    then
        this.isBack (false )
    elseif(zp > 5)
    then
        this.isBack (true )
    end
	if(this.isBack ( ))
    then
        object.setTranslation ( this.getObject ( ) , 0, 3, zp-0.005-math.abs ( this.jump ( ) ), object.kGlobalSpace )
    else
        object.setTranslation ( this.getObject ( ) , 0, 3, zp+0.005+math.abs ( this.jump ( ) ), object.kGlobalSpace )
    end
    this.jump (0 )
--------------------------------------------------------------------------------
end
--------------------------------------------------------------------------------
For onCaptureInput:
function EggAI.onCaptureInput ( d )
--------------------------------------------------------------------------------
    if(d==1)
    then
        this.jump ( 0.1)
        this.isBack ( false)
    elseif(d==-1)
    then
        this.jump ( -0.1)
        this.isBack ( true)
    end
--------------------------------------------------------------------------------
end
--------------------------------------------------------------------------------
We are done with the variables and code for EggAI.
Enter Variables and Code for the MainAI
Now, we will work on the MainAI. This is the last piece of code before we compile everything and run a local test. In the AIModel Editor's MainAI tab, add the three variables shown below.
- name: egg, type: object, init value: nil
- name: prevTouchCount, type: number, init value: 0
- name: prevY0, type: number, init value: 0
By clicking Add Function, add three functions: displayRestart, requestRestart and reset.
Finally, add four handlers: onInit, onTouchSequenceBegin, onTouchSequenceChange and onTouchSequenceEnd. Note that to add the latter three handlers, you need to select Add Handler -> User Handler.
For each of the functions and handlers above, replace the code with the following in the Script Editor. Do not forget to save using Control+S.
For displayRestart:
function MainAI.displayRestart ( )
--------------------------------------------------------------------------------
    local lUser = application.getCurrentUser ( )
    local lComp = hud.newComponent (lUser, hud.kComponentTypeLabel)
    if ( lComp ~= nil )
    then
        hud.setComponentPosition (lComp, 50, 50 )
        hud.setComponentSize (lComp, 100, 10 )
        hud.setComponentBackgroundColor (lComp, 0, 0, 0, 0 )
        hud.setComponentBorderColor (lComp, 0, 0, 0, 0 )
        hud.setComponentVisible (lComp, true )
        hud.setComponentZOrder (lComp, 255 )
        hud.setLabelText (lComp, "Game Restarting" )
        hud.setDefaultFont (lUser, "DefaultFont" )
        hud.setLabelTextHeight (lComp, 100 )
        hud.setLabelTextAlignment (lComp, hud.kAlignCenter, hud.kAlignCenter )
    end
--------------------------------------------------------------------------------
end
--------------------------------------------------------------------------------
For requestRestart:
function MainAI.requestRestart ( )
--------------------------------------------------------------------------------
    application.restart ( )
--------------------------------------------------------------------------------
end
--------------------------------------------------------------------------------
For reset:
function MainAI.reset ( )
--------------------------------------------------------------------------------
    this.prevTouchCount (0)
    this.prevY0 (0)
--------------------------------------------------------------------------------
end
--------------------------------------------------------------------------------
For onInit:
function MainAI.onInit (  )
--------------------------------------------------------------------------------
    application.setCurrentUserScene ( "MyScene" )
    application.setOption ( application.kOptionViewportRotation,3 )

    local lCamera = application.getCurrentUserActiveCamera ( )
    object.setTranslation ( lCamera, 6, 7, 5, object.kGlobalSpace )
    object.lookAt ( lCamera, 0, 1.9, -1, object.kGlobalSpace, 1 )

    this.egg (scene.getTaggedObject (application.getCurrentUserScene ( ),"egg"  ) )

    input.enableMultiTouch ( this.getUser ( ), true )
    this.reset()
--------------------------------------------------------------------------------
end
--------------------------------------------------------------------------------
For onTouchSequenceBegin:
function MainAI.onTouchSequenceBegin (  )
--------------------------------------------------------------------------------
	this.reset ( )
--------------------------------------------------------------------------------
end
--------------------------------------------------------------------------------
For onTouchSequenceChange:
function MainAI.onTouchSequenceChange ( nTaps0, nX0, nY0, nTaps1, nX1, nY1, nTaps2, nX2, nY2, nTaps3, nX3, nY3, nTaps4, nX4, nY4 )
--------------------------------------------------------------------------------
    local touchCount = 0
    if(nTaps0 > 0) then touchCount = 1 end
    if(nTaps1 > 0) then touchCount = 2 end
    if(nTaps2 > 0) then touchCount = 3 end
    if(nTaps3 > 0) then touchCount = 4 end
    if(nTaps4 > 0) then touchCount = 5 end

    if ( touchCount == this.prevTouchCount())
    then
        if ( touchCount == 1 )
        then
            if(nY0 > this.prevY0())
            then
                local d = -1
                object.sendEvent ( this.egg ( ), "EggAI", "onCaptureInput", d )
            elseif(nY0 < this.prevY0())
            then
                local d = 1
                object.sendEvent ( this.egg ( ), "EggAI", "onCaptureInput", d )
            end
        elseif(touchCount == 2)
        then
        if(math.abs (nY0 - nY1) > 0.2)
            then
                this.displayRestart (  )
                this.postEvent (1,"requestRestart" )
            end
        end
    end

    -- store this event's variables for the next event
    this.prevTouchCount (touchCount)
    this.prevY0 (nY0)
--------------------------------------------------------------------------------
end
--------------------------------------------------------------------------------
For onTouchSequenceEnd:
function MainAI.onTouchSequenceEnd (  )
--------------------------------------------------------------------------------
	this.reset ( )
--------------------------------------------------------------------------------
end
--------------------------------------------------------------------------------
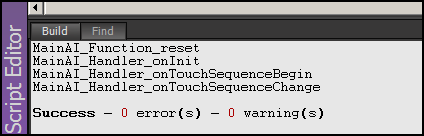
Now, press F7 to compile everything. You should see 0 errors and 0 warnings.
Animate Game to Test
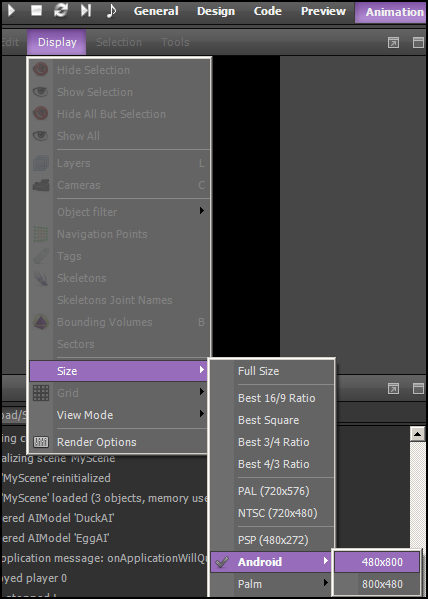
Now, let's test the game. On the top bar menu, select Animation. Then, select Display -> Size -> Android -> 480x800 as shown below.
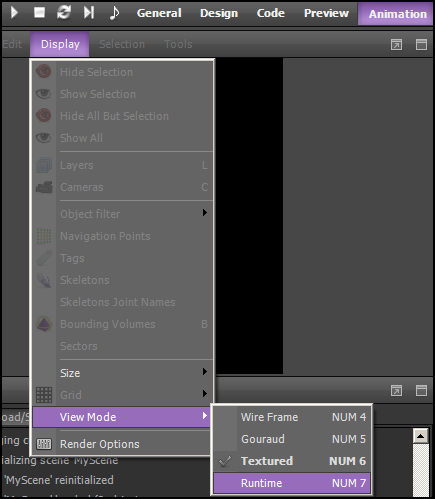
Then, select Display -> View Mode -> Runtime.
Press F9 to start animating. The game starts playing as follows.
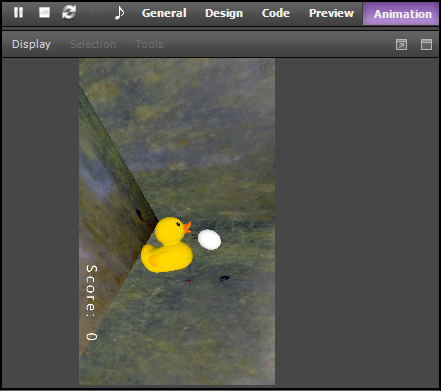
Note that you cannot move the egg at this point, because the motion of egg is controlled via screen touch events. Therefore, the actual test of moving the egg can be done only after installing it in an Android device. While animating in the ShiVa Editor, the duck and the egg will move freely without any input. During the free motion, they may collide with each other every once in a while. When this happens, the duck will change its direction of rotation in the global axis. You will also notice that after each collision a browser will be opened to display the URL http://www.stonetrip.com. This is because of the following line in function DuckAI.onSensorCollisionBegin:
	...
	system.openURL ("http://www.stonetrip.com","")
The purpose of this line is to vibrate the device when a collision occurs. We will edit the Java code in Eclipse to override the system.openURL() event handler to vibrate the device instead of opening a browser. For now, you can prevent the ShiVa Editor from opening a browser automatically during the animation. For that purpose, comment out the line of code in DuckAI.onSensorCollisionBegin as below and then recompile before starting the animation.
	...
	--system.openURL ("http://www.stonetrip.com","")
However, do not forget to remove the double dash (--) and recompile everything before exporting the game.
Export the Game
Having finished developing our game, now we will export it to be used by the ShiVa Authoring Tool.
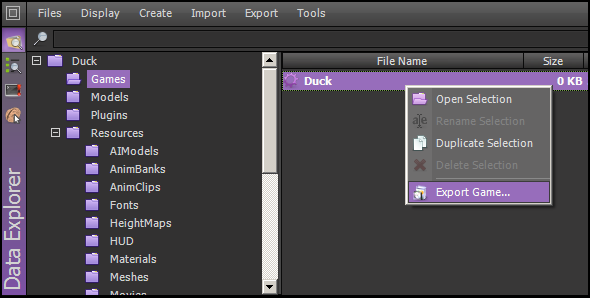
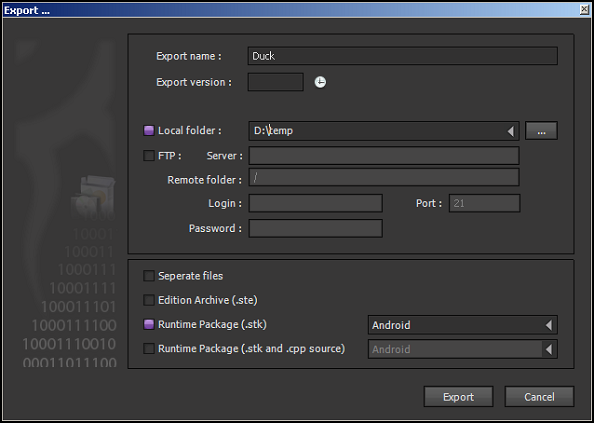
In the Data Explorer, highlight the Games folder and select Duck. From the right-click menu select Export Game as shown below.
Select a local folder, e.g. D:\temp. Also select Runtime package for Android. Click Export. (See below.)
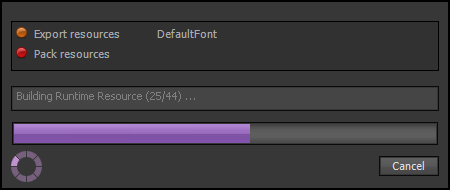
A progress dialog will appear as shown below.
Wait until the export completes and press OK to dismiss the dialog. See below:
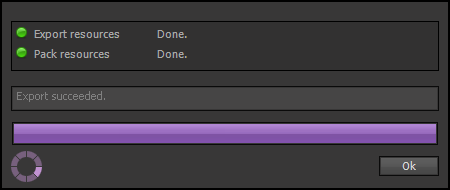
Now, you should see a file named Duck.stk in the local folder you had selected to export the game.
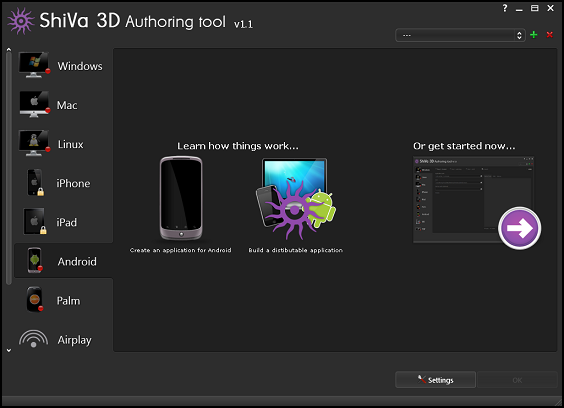
Shiva Authoring Tool
In this section, we will discuss the Shiva Authoring Tool. As mentioned previously, the main purpose of the ShiVa Authoring Tool is to convert a game, created via the ShiVa Editor, into an application that can be deployed in a particular device. Below, we will describe the steps to convert the game into an Android application.
Prepare the Android Device for Installation
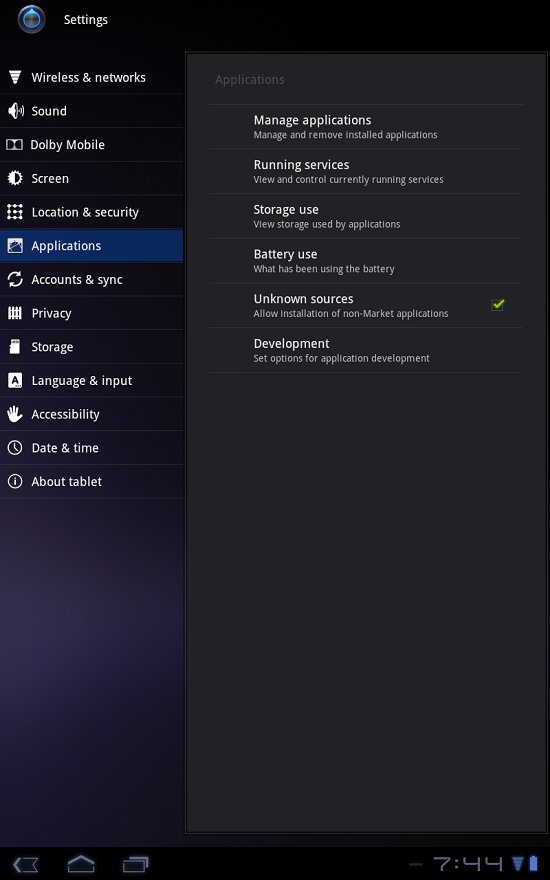
Since the Shiva Authoring Tool can be used to install the game in the Android device, you need to prepare the device for installation. Firstly, in Application settings, check Unknown sources as shown below.
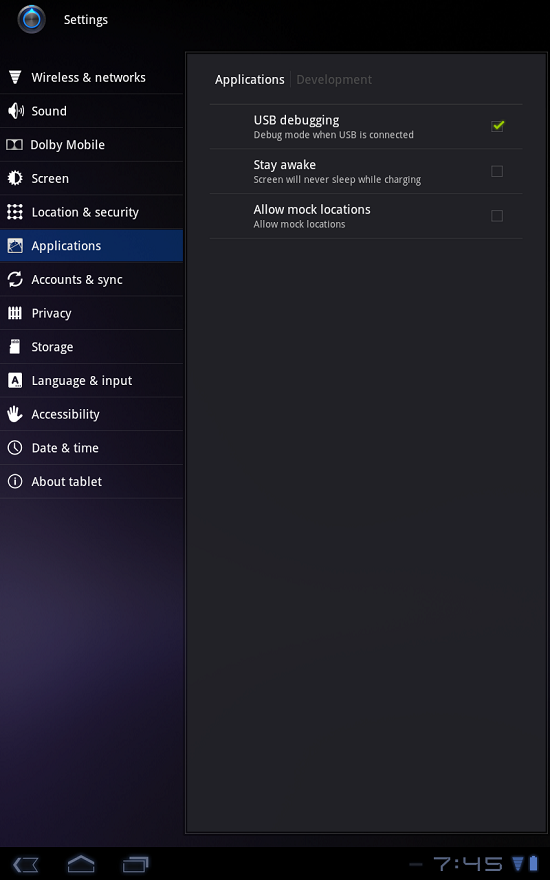
Then, in the Development Options of your device check USB debugging as shown below.
Also, make sure that your device is connected to your development machine via a USB cable. Note that when you connect a particular Android device to your development computer for the first time, Windows will install the appropriate device driver in your computer. You may need to point the Add Hardware Wizard to the location of the Android SDK installation folder for the wizard to find a suitable driver.
Authoring for Project
As we discussed earlier in the tutorial, the two available authoring types in the Shiva Authoring Tool are Project and APK Package. Authoring for Project generates an Eclipse project to further customize the game application in Eclipse. Authoring for APK Package generates an Android APK file for directly installing the game application in the device. Since we want to customize the game to vibrate the device when a collision occurs, we will first review the authoring process for project.
In the instructions below, it is assumed that Duck.stk is installed in D:\tmp. If you stored it in another location, change those instructions accordingly.
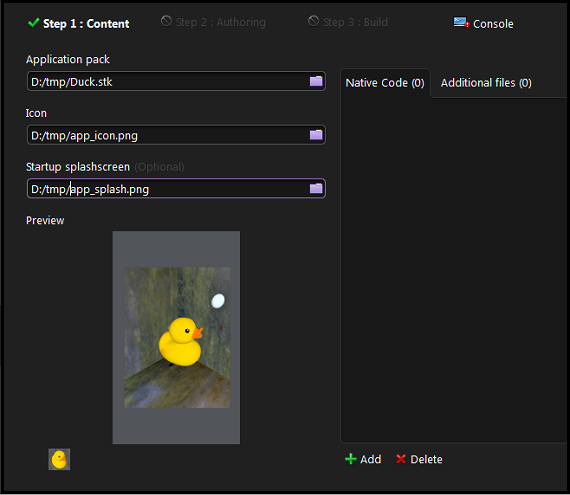
In preparation for this section, extract app_icon.png and app_splash.png from the download archive accompanying this tutorial and save them under a local folder, e.g. D:\tmp. The app_splash.png file will be displayed as the splash page in the device for the game when it starts. The app_icon.png will be displayed in home screen of the Android device as shown below.
Bring up the Shiva Authoring Tool. Select Android on the left navigation. Click on the arrow image under 'Or get started now...' as shown below.
In Step 1, select Duck.stk, app_icon.png, and app_splash.png from local folders of your computer as shown below. Here, notice that the folder separator is slash (/), not backslash (\) . Press Next.
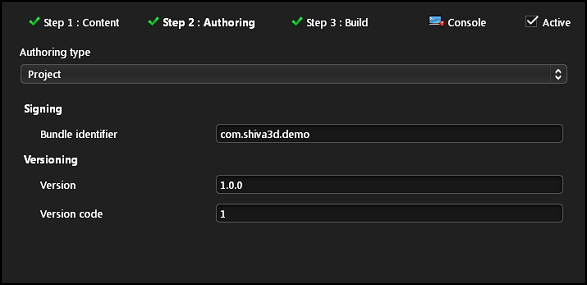
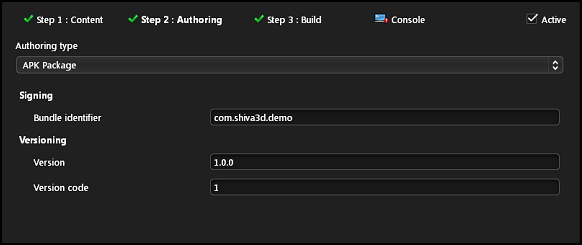
In Step 2 under Authoring type, select Project. For Bundle identifier type in a name, e.g com.shiva3d.demo. This name corresponds to the Java package name. Accept defaults for Version and Version Code (see below). Click Step 3: Build.
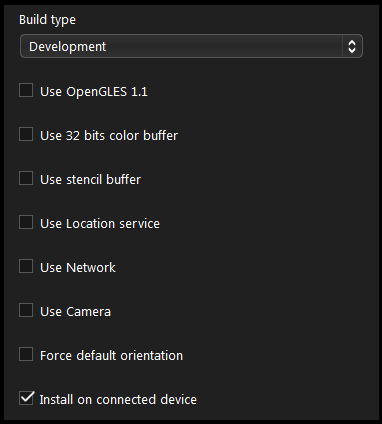
In Step 3, select Build type: Development, and leave all checkboxes unchecked as shown below.
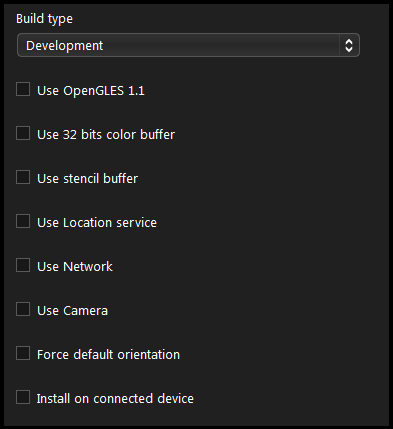
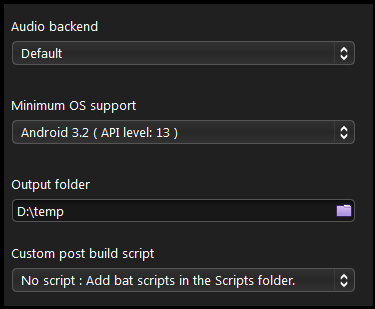
Also, make the following selections:
- Audio backend: Default
- Minimum OS support: Android 3.2 (API level: 13)
- Provide an output folder, e.g. D:\temp
- Accept the No script option for Custom post build script
Those are shown below.
Note that our main target in this tutorial is Android 3.2, for which the application has been tested.
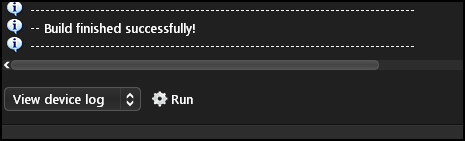
Click Build. This will bring the console view. If everything goes properly, you will see a message saying 'Build finished successfully!', as shown below. Also, in the output folder (D:\temp) you should see Duck_Android.zip.
Authoring for APK Package
Here, we will review the authoring process used to create an APK file (which is an Android application) that can be directly installed in a device. As an option, you can install the game in your device as part of the build. To do this, you must have completed the steps described above in 'Prepare the Android Device for Installation'.
Note that if you are authoring for APK Package, customization of the code in Eclipse will not be possible. As a result, the vibrate feature will not be available (i.e., when the duck and egg collide the device will not vibrate). For this reason, you need to edit DuckAI.onSensorCollisionBegin and comment out or remove the following line:
system.openURL ("http://www.stonetrip.com","")
Then, compile and export Duck.stk as we did before.
Now, bring up the Shiva Authoring Tool and go through the same steps as above with the following exceptions.
In Step 2, select authoring type as APK Package rather than as Development:
In Step 3, check Install on connected device (see below)
When the build steps are completed, in the output folder you should see Duck-debug.apk. Also, the game must have been installed in your device. (Note that if you do not want to install the application in the device as part of the build, do not check Install on the connected device. You can install Duck-debug.apk in your device another time using the ADB Tool in Android SDK.)
Closing Remarks for Part 4
In part 4, we finished coding for the EggAI and the MainAI, and performed unit testing by animating the game. We then exported the game from the ShiVa Editor for importing into the Shiva Authoring Tool. Finally, we discussed two different authoring options in the Shiva Authoring Tool, one for generating an Android executable and another one for generating an Eclipse project. In part 5, we will start by learning how to customize the game in Eclipse. This will include the Eclipse project setup, code changes, building the Java code, and native libraries. At that point we will have completed the tutorial in terms of development and deployment. In the remainder of part 5 we will review the code and discuss how to port the game to iOS devices.

Comments